
Giraffe love- Masking Technique and Cutting The Stamps

Hello crafty people! :D
Devika here and today I will share a wonderful trick of using the Stamp sentiments in different ways to increase their usage.

You can also follow me on these social media accounts:

https://www.facebook.com/houseofillusiondelhi/

https://www.youtube.com/channel/UCNGR6yuGN1tm2HzpwuYQOIA

https://www.instagram.com/thehouseofillusion/


Masking Technique and Cutting The Stamps
  • Trim a blue coloured cardstock in a size a bit smaller than the white coloured cardstock base.
  • Cut two panels from Green cardstock in a "hill" pattern free hand, like I did, or with a die.
  • Stamp the sides of the green cardstock with the stitched line stamp from the Meraki stamp set and also stamp the sentiment, "I Love You" from the Giraffe love stamp set using Ranger Black Archival ink pad.
  • Heat emboss the "I love you" sentiment with clear embossing powder to give it that glossy finish. As the ink is wet, the powder will stick to it and will give an embossed look.


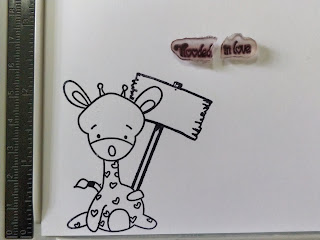
  • Stamp the giraffe image from the Giraffe Love stamp set using Ranger Black Archival ink, on a white cardstock, 300 GSM.
  • I wanted the giraffe to hold the wooden plank. So I fussy cut the image on Sticky notes/masking sheet and stamped the wooden plank image on top of the masked image.
  • When you have stamped the wooden plank, remove the masking sheet and you will see how wonderfully the overall image appears.
  • I love this masking technique as it gives a natural look to the stamped images.


  • I cut the "Flooded in love" sentiment with scissors in order to fit in on the wooden plank.... Isn't that a lovely trick! :D
    You can use this trick for other stamps also and use these cut stamps to mix and match with other stamps.

  • Stamp the other image, fussy cut it and colour it.
    (I have used distress inks, Fossiled amber and Spiced mermalade to colour the giraffes and Spun sugar to colour the wooden plank by smooshing the ink pads on the craft sheet and sprintzing them with water.)


  • Foam mount the images and you think cutest, love filled card.
  • I also stamped another sentiment on the inside.


Comments

Popular posts from this blog

Birdhouse Decoupage + Crackle

Namaste crafters! It's summertime..so let's make cute birdhouses for the birds to rest in this summer! This time on my trip to the Itsy Bitsy store, I saw these amazing birdhouses in all sizes and amazing designs..I just couldn't control myself and ended up buying tons of these..they are just too adorable and pretty!! Let's have a step by step look at how I created them! Its complete video will also be uploaded soon next week..just some editing left :)  For all the birdhouses, I have primed them with 2 layers of gesso. Paint the base with white chalk/acrylic paint. Let it dry. Put a layer of 1 step crackle medium from Itsy Bitsy.  Apply thick layer for thicker cracks and thin layer for thinner cracks. Let it dry naturally. You can dry it with a heat tool as well but natural drying gives your project better cracks. I have used crackle mediums of many companies but I personally feel that the 1 step crac

DIY Stencil

Hello crafty friends! Devika here and today I will share how to create your own stencil and make a card using it! You can also follow me on these social media accounts: https://www.facebook.com/houseofillusiondelhi/ https://www.youtube.com/channel/UCNGR6yuGN1tm2HzpwuYQOIA https://www.instagram.com/thehouseofillusion/ THIS BLOGPOST IS WITH A GIVEAWAY!! RULES MENTIONED AT THE END OF THE POST Dreamy Sky  Take a white cardstock. Make a cloud stencil with the masking sheet. Just draw the cloud edges with a pencil on a masking sheet. Cut the sheet along the edges and you will get your own "Cloud stencil."  Now use Sapphire blue ink along the "clouds stencil" and cover the whole background with it. Use Lemon yellow ink through the Rays stencil by Kaisercraft. (If you do not have a Ray's stencil then just place the masking tape on the cardstock with a one finger gap between each ray and thus you can create the stencil also)

Autumn Florals

Namaste crafty people! :D Let's welcome the Autumn season with a pretty floral card! I am not really a floral person BUT THIS "Floral wishes" stamp set by Craftyscrappers has made me fallen in love with florals.. i am not kidding :) It is designed very intricately with perfect and crisp detailing! Watercolouring these images is just pure fun..I actually stamped tons of them and made a DIY watercolour booklet for myself :p If you like my work, you can also follow me on these social media accounts: https://www.facebook.com/houseofillusiondelhi/ https://www.youtube.com/channel/UCNGR6yuGN1tm2HzpwuYQOIA https://www.instagram.com/thehouseofillusion Autumn florals Take a sheet of White cardstock from Craftyscrappers. Stamp the floral images using Black archival ink pad and a stamping platform. Colour the images with any medium you want, I personally love colouring with Distress inks so I coloured the flowers with the inks. Distress inks us